Step 1: Configure the First Device
The first stage is to configure the first device for HA.
During this stage, make sure that the second device is powered off or disconnected from the network.
|
➢
|
To configure the first device for HA: |
|
1.
|
Configure the network interfaces, including the default OAMP interface: |
|
a.
|
If you are already connected to the SBC via keyboard and monitor, change the OAMP parameters to suit your networking scheme through CLI (refer to the Installation Manual).
|
|
b.
|
Connect to the SBC's Web interface with the newly assigned OAMP IP address.
|
|
d.
|
Configure the Control and Media network interfaces, as required. |
|
e.
|
Add the HA Maintenance interface (i.e., the MAINTENANCE Application Type). |
Make sure that the Maintenance interface uses an Ethernet Device and Ethernet Group that is not used by any other IP network interface. The Ethernet Group is associated with the Ethernet Device, which is assigned to the interface.
The IP Interfaces table below shows an example where the Maintenance interface is configured with Ethernet Device "vlan 2" (which is associated with Ethernet Group "GROUP_2"), while the other interface is assigned "vlan 1" (associated with Ethernet Group "GROUP_1"):

|
2.
|
If the connection is through a switch, the packets of both interfaces should generally be untagged. To do this, open the Ethernet Devices table (see Configuring Underlying Ethernet Devices ), and then configure the 'Tagging' parameter to Untagged for the Ethernet Device assigned to the Maintenance interface. The figure below shows an example (highlighted) where VLAN 2 is configured as the Native (untagged) VLAN ID of the Ethernet Group "GROUP_2": |

|
4.
|
Configure HA parameters: |
|
a.
|
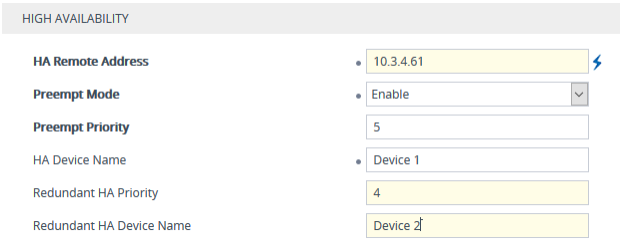
Open the HA Settings page (Setup menu > IP Network tab > Core Entities folder > HA Settings): |
|
b.
|
In the 'HA Remote Address' field, enter the Maintenance IP address of the second device. |
|
c.
|
(Optional) Enable the HA Preempt feature by configuring the 'Preempt Mode' parameter to Enable, and then setting the priority level of the device in the 'Preempt Priority' field. Make sure that you configure different priority levels for the two devices. Typically, you would configure the active device with a higher priority level (number) than the redundant device. The only factor that influences the configuration is which device has the greater number; the actual number is not important. For example, configuring the active with 5 and redundant with 4, or active with 9 and redundant with 2 both assign highest priority to the active device. Configuring the level to 10 doesn't cause a switchover upon Ethernet connectivity loss. For more information on the feature, see Device Switchover upon Failure. |
|
5.
|
Save configuration to flash without a restart. |
|
6.
|
Power down the device. |